The "Share Tours" Add-on allows you to share webpages of your tours. These links can be easily used across social media, newsletters, webpages, or email, providing a powerful tool to market your tours through SafariOffice.
Additionally, with the "Share Tours" option, you gain access to the SafariOffice request form feature. When clients use this form to request a quote, their request is automatically added to SafariOffice, streamlining your booking process and enhancing your customer management.
Activating the Add-on
- To activate the Add-on go to Settings > Add-on store.
- Click 'Activate Add-on'
- If you haven't filled out Billing and Payment details yet fill those out first,
and then select a plan (yearly or monthly, switch any time) - After subscribing you will have access to the below functionality. Find your subscription in the Subscriptions tab
Quick Links
- Using the Share Tours Add-on
- Setting up a Shared Tour
- Add Tour Page Introduction
- Add a From Price
- Add (Additional) Price Information
- Option: Set Fixed Departure Dates
- Add a Request Form
- Publishing and generating the tour link (webpage)
- Tracking Leads per source
-
Unpublish a Tour, taking it offline
Using the Share Tours Add-on
Go to your Tour Templates to create and manage Shared Tour links.
- Click the Share Tour button.
- This will open the settings window.
- Here you can set up your Tour Page and Publish it.
You'll find the status of a tour next to the button.
When you get started tours will be offline for sharing.
Offline: The tour is offline and not published yet, links cannot be shared. Publish them to get them online for sharing. Click the button to set-up the page and click 'publish' at the bottom once done.
Online: The tour is online and published, links can be shared anywhere. Unpublish them to set it offline.
Setting up a Shared Tour
A shared tour can have a few different settings. This helps you market the tour in the way you want. Below we explain a few of these settings and how to use them.
Add Tour Page Introduction
You can change the default title and add a short introduction to the tour (free text area).
The default paragraph title is 'Introduction', change it to anything you like better.
Use the introduction field if you like to give the client a summary of this tour, for example giving some highlights of the tour or specific unique selling points for the tour.
Who is this trip created for or what are the specific highlights?
Example introduction paragraph (Classic Style example)
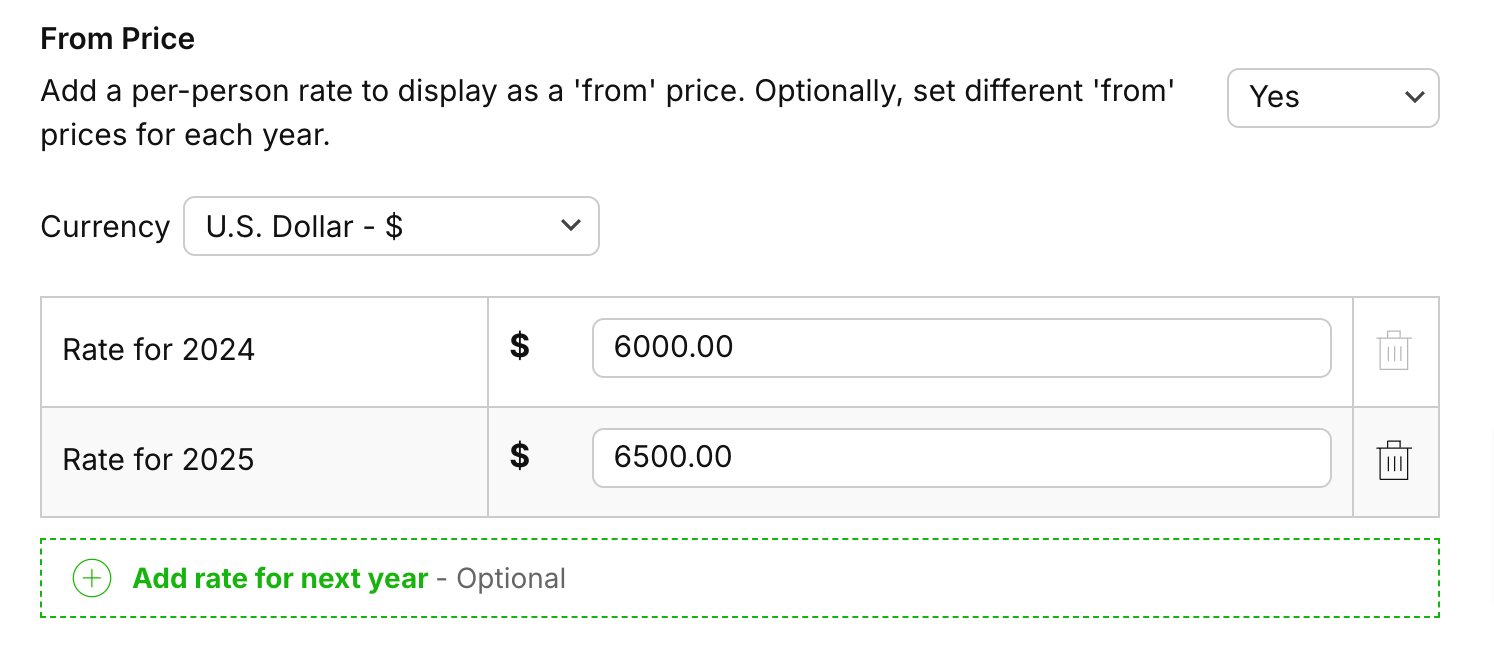
Add a From Price
You can optionally add a "From" price to give the clients some idea of the price.
This price will be shown in the top bar and also in the price details panel of the tour page.
- Choose a currency you'd like to promote the tour in. Any of the currencies you have chosen in the System Settings are available. Only one currency per tour can be chosen.
- Add a price this will be the Current rate and this will always be used, regardless the current year.
Optional rates per year
If you want to add a 'from rate' for the next year can click 'Add rate for next year'. Now the current rate will become the current year rate and you are free to add rates which will be shown online for the coming year(s). On the first of January, these will become the new current rates for that year.
One 'Current price' or 'Add per year'
Rates per-person per year
Add (Additional) Price Information
This is a free text field.
- Select 'Yes' if you want to add extra information concerning the price.
- If you did choose to show a 'From' price you can add some additional information like how the price might vary or any other details you want to give to inform clients a bit more.
If you didn't set a 'From' price you can still use this field as well. It will become Price Information and you just have a free text field to provide some extra price information.
Remember this is for marketing the tour, in the actual quote you create for a request you can detail your price further.
Option: Set Fixed Departure Dates
If you want to show the tour has fixed departure dates you can select 'Yes' here.
Once you do that you get more settings.
A table with dates:
- You can add dates the tour starts, Click Add Departure Date.
- Select a date from the calendar.
- You can optionally show a status regarding the availability per date.
SafariOffice provides a few by default but you simply add custom ones by typing these in.
> The default status 'Full' will show the date is not available anymore (strike through) on the tour page. - You can also delete the date. Remember this will not delete any requests already made for this date. It will remove the date in full from the online tour page.
Allow a flexible booking date as well (optional)
If you want to allow clients to also request this tour for a flexible date set the setting to yes. This will allow the client to not only pick one of the fixed dates but also choose a different date.
Latest Request time
Set the amount of time before the tour starts you want to receive the request at the latest. When this date has been reached the date becomes unavailable to select for clients. You can also set this up in your Default System Settings to always apply.
Example:
Clients can select an available date when requesting a tour with fixed departure dates.
Add a Request Form
If you want to add a request form to convert viewers into clients directly from the tour page you have two options:
Option 1. Select to add the SafariOffice Request form. Any request a client submits through this form will directly end up as a request in SafariOffice (no need to add the details anymore). You will still get a notification in your email box.
Select: 'Yes, show the SafariOffice request form.'
> You now have the following fields you can adjust, you might want to do this in the System Settings so they always apply these settings when creating a tour page:
Request Email: You can set a fixed email address (per tour or in the ettings) that receives notifications when a request is received through the form. All users that have set their notification to on will also receive an email.
Request Button Text: You can change the default text on the button that shows on the tour page that leads to the request form. The default is: Get a free quote, but you might want to change it to Inquire now for example. You can do this.
Introduction Text Request Form: This text will be shown above the request form. You can use this to give the clients some information or encouragement so they understand why they should fill out the form. You can adjust the default text SafariOffice provides in the Default Settings to apply to all tour pages.
Thank You Page. Set a custom message to thank people after they have submitted the request. SafariOffice provides a default text, but you can adjust this text in the Default Settings to apply to all your tour pages.
Option 2. Select another request form outside of SafariOffice. If you want to use your request form on your website you can also add a weblink to this request form. The details won't automatically end up in SafariOffice but it gives you the freedom to use your own set-up request form.
Select: 'Yes, add another request form (weblink)'
Custom Button Label: You can change the default text on the button that shows on the tour page that leads to the request form.
Weblink / URL: add the website address also known as URL in this field. The button will now link to this page whenever a client clicks this button.
Publishing and generating the tour link (webpage)
Once you have set up the page you can now Publish the page.
- Click 'Publish & Generate Tour Page Link' at the bottom of the modal.
> You will now get your first link.
2. Copy the tour link. This link can be used to share anywhere. Any lead captured on this page will be a generic 'SafariOffice' source. If you want to track more specifically read the next paragraph on tracking specific lead sources.
Tracking Leads per Source
If you want to track where leads came from so you get better insights into which sources perform best you can also create unique links (for the same tour) to capture leads per source.
- First click + Add Lead Tracking Link
-
Choose a Lead Source (add a custom one if you wish by simply typing it in),
and click 'Generate Tracking Link' - Copy the Tour Link for that source and share it on the correct source to start tracking leads.
- Copy Form Link Only option if you want to track the leads using the request form.
SafariOffice will now track and show leads as 'SafariOffice - Instagram' or 'SafariOffice - Website'
Unpublish a Tour, taking it offline
If you want a tour not to be available anymore simply click 'Unpublish' at the right bottom.
The tour will not be available anymore, clients will get a message the page is not available anymore.